心之所向 素履以往

0%

练习使用docker,记录下具体流程。


拉取 nginx 镜像
1
2
# 选择更小体积的基础镜像
docker pull nginx:alpine
第一次启动 nginx 容器
1
docker run -d --rm --name nginx nginx

--rm会在容器停止时删除,--name nginx 命名容器名为 nginx, nginx表示使用 nginx 镜像

拷贝容器的 nginx 目录到宿主机
1
2
# $PWD 表示当前绝对路径
docker cp nginx:/etc/nginx/ $PWD/conf

windows 下需要在管理员模式下进行,否则报A required privilege is not held by the client.权限错误

停止 nginx 容器(自动删除)
1
docker stop nginx
第二次启动 nginx 容器, 挂载配置文件,容器会使用宿主机的 nginx 配置
1
docker run -d  -p 80:80 --name nginx -v $PWD/conf:/etc/nginx -v D:/project/:/usr/local/web nginx

-p 80:80表示把本机的 80 端口映射到容器的 80 端口(local port:docker port),此时可以打开 localhost:80(或 localhost)看到 nginx 欢迎界面;

-v $PWD/conf:/etc/nginx 表示把容器的配置目录/etc/nginx/nginx.conf 映射到宿主机的 $PWD/conf目录

-v D:/project/:/usr/local/web表示把宿主机的D:/project/目录挂载到容器的/usr/local/web目录

修改宿主机conf/nginx.conf配置
  • 作为静态服务器(以单页面应用为例),将D:/project/project1/dist作为根目录
1
2
3
4
5
6
7
8
9
10
11
12
13
14
15
16
17
18
http {
...
server {
# 对应-p 80:80 的冒号后面的'80'
listen 80;
# 访问域名
server_name t.test.com;

# 容器启动时根据-v D:/project/:/usr/local/web 映射
root /usr/local/web/project1/dist;
index index.html index.htm;
location / {
try_files $uri $uri/ index.html;
index index.html;
}
}
...
}
  • 若需要反向代理,可以增加下列配置
1
2
3
4
5
6
7
8
9
10
11
12
13
# 代理容器的8000端口到宿主机的80端口
http {
...
server {
listen 80;
server_name t1.test.com;
location / {
# 此ip为docker网关IP(可换成宿主机具体IP), 不能为localhost或127.0.0.1或0.0.0.0(会报502 Bad Gateway), 因为映射的是docker里的ip,
proxy_pass http://10.0.75.1:8000;
}
}
...
}

查看容器在宿主机的 ip:
windows: ipconfig 配合 route print
linux: ip addr show docker0

重启 conf/nginx.conf
1
docker exec -it nginx service nginx reload

分支比较
1
2
3
4
5
6
7
8
git diff  

option:
--name-only 只比较文件名
--stat 比较统计信息

a). git diff <branch1>..<branch2> 比较两个分支之间差异
b). git diff --staged 比较暂存区和版本库差异
管理源
1
2
3
4
git remote -v 查看远程源
git remote show origin 查看remote地址,远程分支,还有本地分支与之相对应关系等信息
git remote rm origin 删除源
git remote add origin <url> 添加源
设置分支远程与本地的对应关系
1
git branch -u origin/<branch> <branch>
删除远程分支
1
2
git push origin --delete <branch> 
git remote prune origin 删除远程仓库不存在的分支
回退到的版本
1
git  reset --hard  <commit ID>
撤消上一个commit,但保留add的文件
1
git reset --soft HEAD~1
撤销add内容
1
git reset head
清除untracked files
1
git clean -f -d
合并commit id
1
git cherry-pick <commit id>
免密登陆
1
git config --global credential.helper store
提交所有标签
1
git push origin --tags
更新version
1
npm version [<newversion> | major | minor | patch | premajor | preminor | prepatch | prerelease | from-git]
删除远程标签
1
git push origin --delete tag <tagName>
查看git stash pop操作
1
git fsck --no-reflog
恢复因git reset –hard导致丢失的工作区文件
1
2
3
find .git/objects -type f | xargs ls -lt | sed 20q

//.git/objects/1f/b72f8f5e711cf3c6e968942bf70c7668e05d75

注意去掉分隔符 git cat-file -p 1fb72f8f5e711cf3c6e968942bf70c7668e05d75

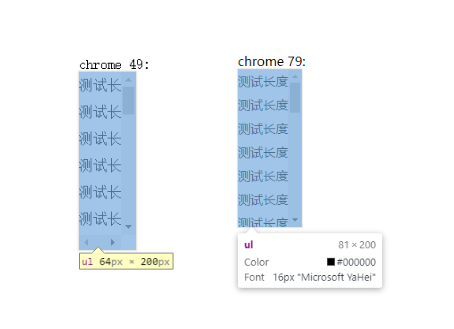
我们知道,设置overflow: auto后盒子会随着内容超出自动出现滚动条,而设置overflow:scroll滚动条会一直存在。但overflow: auto表现却是有差异的

https://developer.mozilla.org/zh-CN/docs/Web/CSS/overflow

以 chrome49 与 chrome79 为例:

1
2
3
4
5
6
7
<!-- html -->
<div class="box">
<ul>
<li>测试长度</li>
...
</ul>
</div>
1
2
3
4
5
6
7
8
9
10
11
12
13
14
15
16
17
18
19
20
21
22
23
/* css */
ul,
li {
list-style: none;
margin: 0;
padding: 0;
}

.box {
display: inline-block;
}

ul {
box-shadow: 0 0 1px 1px #ddd;
max-height: 200px;
overflow: auto;
}

li {
line-height: 30px;
/* 撑开容器以完整显示 */
white-space: nowrap;
}
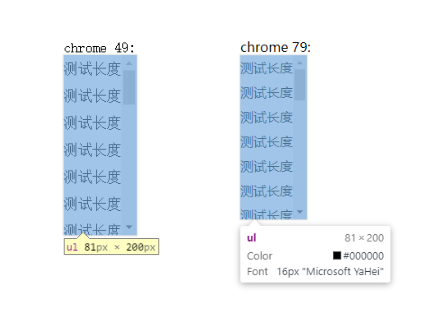
  • overflow:auto 表现不一致。可以看出 chorme79 下.box的width与 chorme49 下content+滚动条width(通常默认是17px)是相等的。说明在 chrome49 下overflow:auto滚动条占据了内容的部分宽度导致内容显示不全,而高版本 chrome79 下不占用内容宽度。
1
2
3
4
ul {
max-height: 200px;
overflow: auto;
}

overflow:auto

  • overflow-y: scroll表现一致,与 chrome79 下的overflow: auto效果相同
1
2
3
4
ul {
max-height: 200px;
overflow-y: scroll;
}

overflow:scroll

为了抹平 chrome 之间差异,可用下面css方案解决,js方案不再赘述

  • 定宽
1
2
3
4
5
ul {
max-height: 200px;
overflow: auto;
width: 81px;
}
  • 自适应宽度
1
2
3
4
5
6
ul {
max-height: 200px;
overflow-y: overlay;
/* chrome 默认滚动条宽度是 17px */
padding-right: 17px;
}

overlay 行为与 auto 相同,但滚动条绘制在内容之上而不是占用空间。 仅在基于 WebKit(例如,Safari)和基于 Blink 的(例如,Chrome 或 Opera)浏览器中受支持。

1.打开webstorm,菜单栏找到Tools > Start SSH session

img01
2.点击弹出SSH session表单,输入表单

img02
3.弹出Terminal控制台

img03


提示:暂时没发现有保存记录的功能,每次需要重新操作输入